Recently, I had an opportunity to work on a solution that brought together a unique combination of services on Azure: API Management (APIM), Functions, Event Grid and Logic Apps. This came about while working with a customer who wanted to explore the possibility of turning errors captured in their APIs into events for other services to consume.
Solution Overview
The following diagram illustrates the Azure services used for the solution and highlights how the messages move between the services.
The remainder of this post will outline how this was put together along with the considerations and lessons learned in the process.
Considerations and Understanding Intent
Selecting the appropriate services for an architecture can be a difficult challenge, especially when it can be accomplished several different ways. Additionally, with the constantly changing landscape of features on Azure, it sometimes feels like a moving target. A great way to chip away at a solution is to, of course; always gain a deeper understanding of the requirements with the customer. Specifically, we should be most interested in intent – what exactly do they want to accomplish and what is the purpose of the message or event that is being sent.
For this customer, they simply want to broadcast an event when an error occurs with their APIs. Then, they would like to subscribe to a specific error code (such as a 404), a range of codes, or all error codes if necessary. In short, they need a flexible approach for responding to the errors. These events are transmitted in a manner that does not require a response. This last important detail is the deciding factor for selecting Event Grid as the enabling technology for pushing the events.
Before we dive into Event Grid, let’s talk about how the messages are initially captured and then sent to Azure Functions.
API Management and Functions
API Management has a great mechanism for error handling that allows you to call external services when necessary. When coupled together with Azure Functions, we can put the foundation together for something extremely flexible. Our first goal is to send the errors from APIM to an HTTP callback mechanism, or webhook.

We’ll begin by creating a on-error policy that will pass along important details about the error. The policy could look similar to the code snippet below:
<choose>
  <when condition="@(context.Response.StatusCode >= 400)">
    <send-one-way-request mode="new">
      <set-url>"place-function-endpoint-here"</set-url>
      <set-method>POST</set-method>
      <set-header name="Content-Type" exists-action="override">
        <value>application/json</value>
      </set-header>
      <set-header name="x-functions-key" exists-action="override">
        <value>place-function-key-here</value>
      </set-header>
     <set-body>
      @{ return new JObject(
          new JProperty("Method", context.Request.Method),
          new JProperty("StatusCode", context.Response.StatusCode),
          new JProperty("StatusReason", context.Response.StatusReason),
          new JProperty("UserEmail", context.User.Email),
          new JProperty("UrlPath", context.Request.Url.Path + context.Request.Url.QueryString),
          new JProperty("UrlHost", context.Request.Url.Host)
          ).ToString();
      }</set-body>
     </send-one-way-request>
   </when>
</choose>
Since the errors are being published as a broadcast to other systems, this lends itself nicely to making a one-way request to the webhook. This is optimal for performance in addition to flexibility in our solution.
Functions and Event Grid
The heart of the solution lies in the integration between the function that receives the error details and Event Grid for the distribution of events. Recall that the customer would like the ability to subscribe to the errors several different ways. In order to accommodate this requirement we will inspect the payload of the request from API Management and act accordingly. Let’s get started.

First, let’s put together some basic components by defining a class for the API error object we will be receiving from APIM. The properties in this class match the ones from the on-error policy created earlier.
public class ApiError
{
	public string Method { get; set; }

	public int StatusCode { get; set; }

	public string StatusReason { get; set; }

	public string UserEmail { get; set; }

	public string UrlPath { get; set; }

	public string UrlHost { get; set; }
}
Next, we’ll create a class for the actual grid event. This will provide us with a strongly-typed object that we can use for the event, including the Data property which will be contextual to our solution:
public class GridEvent where T : class
{
	public string Id { get; set; }

	public string Subject { get; set; }

	public string EventType { get; set; }

	public T Data { get; set; }

	public DateTime EventTime { get; set; }
}
Now, we just need several functions that will enable us to make a call to Event Grid. The SendEvent and CreateEventGridSasToken methods below demonstrate how to post a request to an Event Grid topic. This example demonstrates the usage of a SAS token.
public static async Task SendEvent(string topicEndpoint, string topicKey, object data)
{
	// Create a SAS token for the call to the event grid. We can do this with
	// the SAS key as well but wanted to show an alternative.
	var sas = CreateEventGridSasToken(topicEndpoint, DateTime.Now.AddDays(1), topicKey);

	// Instantiate an instance of the HTTP client with the
	// event grid topic endpoint.
	var client = new HttpClient { BaseAddress = new Uri(topicEndpoint) };

	// Configure the request headers with the content type
	// and SAS token needed to make the request.
	client.DefaultRequestHeaders.Accept.Clear();
	client.DefaultRequestHeaders.Accept.Add(new MediaTypeWithQualityHeaderValue("application/json"));
	client.DefaultRequestHeaders.Add("aeg-sas-token", sas);

	// Serialize the data
	var json = JsonConvert.SerializeObject(data);
	var stringContent = new StringContent(json, Encoding.UTF8, "application/json");

	// Publish grid event
	var response = await client.PostAsync(string.Empty, stringContent);
}

public static string CreateEventGridSasToken(string resourcePath, DateTime expirationUtc, string topicKey)
{
	const char resource = 'r';
	const char expiration = 'e';
	const char signature = 's';

	// Encode the topic resource path and expiration parameters
	var encodedResource = HttpUtility.UrlEncode(resourcePath);
	var encodedExpirationUtc = HttpUtility.UrlEncode(expirationUtc.ToString(CultureInfo.InvariantCulture));

	// Format the unsigned SAS token
	string unsignedSas = $"{resource}={encodedResource}&{expiration}={encodedExpirationUtc}";

	// Create an HMCASHA256 policy with the topic key
	using (var hmac = new HMACSHA256(Convert.FromBase64String(topicKey)))
	{
		// Encode the signature and create the fully signed URL with the
		// appropriate parameters.
		var bytes = Convert.ToBase64String(hmac.ComputeHash(Encoding.UTF8.GetBytes(unsignedSas)));
		var encodedSignature = HttpUtility.UrlEncode(bytes);
		var signedSas = $"{unsignedSas}&{signature}={encodedSignature}";

		return signedSas;
	}
}
So far, we’ve put together some helpful pieces for integrating with Event Grid. It’s now time to enhance our Azure Function with the capability of publishing events.
Functions are intended to be small units of work and this one is no different. It has the responsibility of receiving the requests, adding the appropriate filters and then sending it off to Event Grid for any interested consumers. The code for the function looks like this:
[FunctionName("ApiErrorsFunc")]
public static async Task Run([HttpTrigger(AuthorizationLevel.Function,  "post", Route = null)]HttpRequestMessage req,
	TraceWriter log)
{
	log.Info(string.Format("ApiErrorsFunc triggered. {0}", DateTime.Now.ToLongTimeString()));

	// Retrieve the body from the request. If there isn't any
	// content then return a 400 with the appropriate message.
	var apiError = await req.Content.ReadAsAsync();
	if (apiError == null)
		return req.CreateResponse(HttpStatusCode.BadRequest, "Missing body content.");

	await PublishGridEvent(apiError);

	return req.CreateResponse(HttpStatusCode.OK,
		string.Format("ApiErrorsFunc - {0} {1}", DateTime.Now.ToShortDateString(), DateTime.Now.ToLongTimeString()));
}
The implementation for the helper method that actually applies the filters and sends the request is here:
private static async Task PublishGridEvent(ApiError error)
{
	// Set the event subject to 'server' or 'client' based
	// on the status code.
	string eventSubject;
	if (error.StatusCode >= 500)
	{
		eventSubject = "server";
	}
	else
	{
		eventSubject = "client";

		// If the status code is 429 then append
		// additional content to the subject for
		// more filter options.
		if (error.StatusCode == 429)
			eventSubject += "/too-many-requests";
	}

	// Retrieve the event grid endpoint and key so that we can
	// publish events.
	var topicEndpoint = System.Environment.GetEnvironmentVariable("EventGridTopicEndpoint");
	var topicKey = System.Environment.GetEnvironmentVariable("EventGridTopicKey");

	// Events are sent to event grid in an array
	var errors = new List
	{
		new GridEvent()
		{
			Data =
				new ApiError()
				{
					Method = error.Method,
					StatusCode = error.StatusCode,
					UrlHost = error.UrlHost,
					UrlPath = error.UrlPath,
					StatusReason = error.StatusReason,
					UserEmail = error.UserEmail
				},
			Subject = eventSubject,
			EventType = "applicationError",
			EventTime = DateTime.UtcNow,
			Id = Guid.NewGuid().ToString()
		}
	};

	await EventGrid.EventGridUtils.SendEvent(topicEndpoint, topicKey, errors);
}

}
The PublishGridEvent method inspects the status code of the error. If it is greater than or equal to 500, then it will apply a filter called “server” to the subject. Otherwise, it will assume that it’s a client error (4xx) and apply the “client” filter. It will apply an additional filter for a specific error code (429) just to demonstrate how filters can be manipulated. In the end, an instance of a grid event is instantiated with the API error details placed in the Data field. An important note here is that events sent to Event Grid are always placed within an array. This allows us to bundle up several events within a request and reduce unnecessary chatter. The SendEvent method shared earlier is called to ultimately call the event topic endpoint.
Brief Recap
We’ve highlighted a lot of code so far, including some reusable components for communicating with Event Grid. At this point we have established a way to pass along API errors to an Azure Function, which will then publish those as events to any interested consumers. We can now begin subscribing to these events so that we can take action.
Subscribing to a Grid Event
We are finally at the point of wiring this up with some consumers that can respond to the errors. Since Event Grid is publishing these events, it can have many subscribers who wish to be notified. The Subject property of the grid event allows us to essentially add metadata that could be leveraged to filter events for the consumers. For example, if a consumer only wanted to receive events for the server errors, then they would apply a filter to the subscription with the value set to server. Let’s dive into the details.

We’ll start with a simple Azure Function that will subscribe to all the client errors. The implementation doesn’t do much except for creating a log entry to confirm that it is working.
public static class ClientErrorsFunc
{
	[FunctionName("ClientErrorsFunc")]
	public static async Task Run([HttpTrigger(AuthorizationLevel.Anonymous, "post", Route = null)]HttpRequestMessage req, TraceWriter log)
	{
		log.Info(string.Format("ClientErrorsFunc - {0}", DateTime.Now.ToLongTimeString()));
		var errors = await req.Content.ReadAsAsync();
		foreach (var e in errors)
		{
			var message = string.Format("Received: {0} - {1} at {2}",
				e.Data.StatusCode, e.Data.StatusReason, DateTime.Now.ToLongTimeString());
			log.Info(message);
		}

		return req.CreateResponse(HttpStatusCode.OK);
	}
}
Where this all comes together is when a subscription is created to consume the events. This can be done with the Azure CLI but for this example we’ll demonstrate it through the Azure portal. When you view your Event Grid topic from the portal, there will be an option to add an event subscription at the very top:
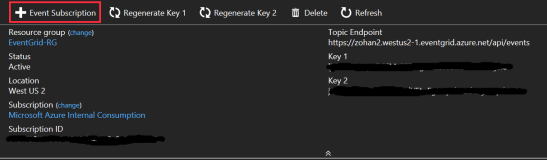
Since we only want this function to receive errors that originate from the client, we’ll set the Prefix Filter accordingly. The endpoint URL in the dialog will reflect the address of the Azure function.

That’s it for the subscription – super easy! Now let’s move on to an example that leverages a Logic App.
For the Logic App we are going to be interested in only the 429 error code. When this occurs we will send out an email to notify the appropriate parties. New to the Logic App Designer is the option to select the Event Grid event as a trigger:

We will select this option and configure the trigger and workflow to look similar to the figure below.

The key takeaway here is how the Prefix Filter is applied to receive only a error codes we are interested in. Sending an email is an oversimplified example. However, what we are interested in showing off is how simple it is to subscribe to the event with a Logic App.
Resources
The code for this solution can be found at the following repository: https://github.com/dbarkol/EventGridDemo
