I recently came across this great session from Build 2018 called Be an integration superhero with Azure and build API-enabled and connected enterprises. The session provides an overview of the integration services on Azure, which include Service Bus, Logic Apps, API Management (APIM) and Event Grid. If you are interested in seeing how these services can work well together, I highly recommend watching it.
In the session, there is a really cool demo where Vlad from the API Management team shows how to make calls to Service Bus from APIM. This approach allows him to protect the Service Bus endpoint by applying policies such as rate-limiting and even change the security mechanism if desired. The two services compliment each other well and provide a realistic example for an order processing scenario.
Inspired by the demo, I wanted to see if the same could be done with API Management and Azure Event Grid. The goal was simple: to publish events to a custom Event Grid topic from within an operation in API Management.
This approach could open up a lot of integration scenarios. For instance, the following diagram showcases a workflow that could be made possible with these two services:
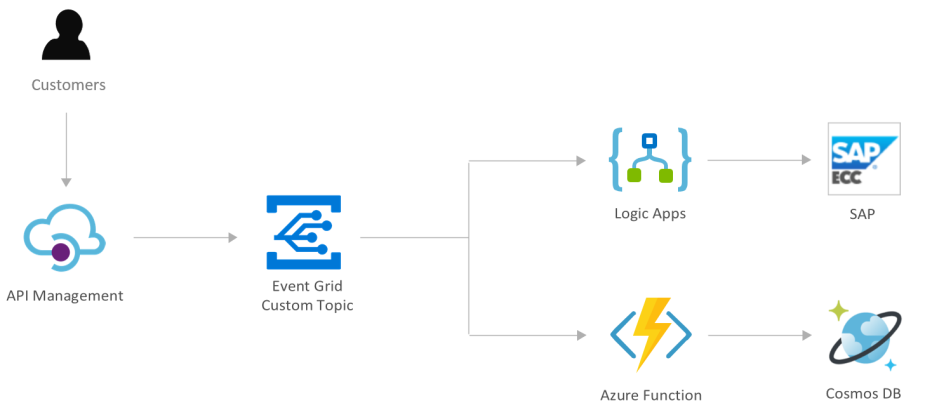
The rest of this blog post will walk through the process of using APIM and Event Grid together. All the code can be found at: https://github.com/dbarkol/EventGrid-API-Management/blob/master/apim-to-event-grid.xml
Setup
The only services on Azure that we’ll need are:
- A Event Grid custom topic. To create a custom topic using the CLI, please refer to the Event Grid docs: https://docs.microsoft.com/en-us/azure/event-grid/custom-event-quickstart#create-a-custom-topic.
- An instance of API Management. We can get away with the Developer tier. To create an instance from the Portal, see: https://docs.microsoft.com/en-us/azure/api-management/get-started-create-service-instance.
Sample Order
Let’s go with the same concept from the Build session of order processing. In this exercise, a customer order will look like this:
{

  "customerId": "1000",

  "order": {

     "sku": "GNR44",

     "quantity": 100

  }

}
The goal will be to publish an event that includes any relevant information from the request body.
Named Values in API Management
One of the first thing we should do is add a pair of named values to the API Management instance. This will avoid any hard-coding of sensitive information within the policies in addition to providing a key/value store for constants.
The first value will be the endpoint to the Event Grid custom topic. It does not need to be marked as a secret. The second named value will be one of the keys for the custom topic, which should be flagged as a secret:

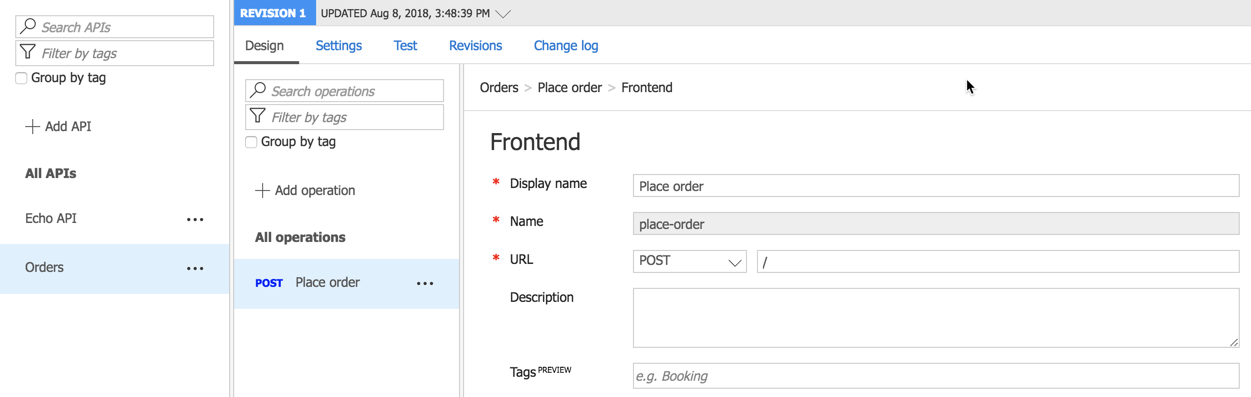
Manually adding an API
Now, we’ll need to manually create an API that we can send requests to. To create a API manually, please refer to the documentation: https://docs.microsoft.com/en-us/azure/api-management/add-api-manually.
I decided to call my API Orders and to add an operation called place-order that will accept POST requests:
API Management Policies
Policies in API Management are extremely powerful and flexible. A policy is really just a XML statement that can also contain embedded C# for additional logic and functionality. If you have never worked with policies before, I encourage you to go through some of the helpful documentation: https://docs.microsoft.com/en-us/azure/api-management/set-edit-policies. Most of what can be accomplished with API Management is done through policies and it’s very easy to get started.
Since this scenario is simply publishing an event to Event Grid and not acting as a facade to any other APIs or services, everything can go into the inbound section of the operation. Also, the send one way request policy is a perfect candidate for these types of scenarios where we just want to make a request to another service and return immediately.
The contents of the send-one-way-request policy is listed here:
This file contains hidden or bidirectional Unicode text that may be interpreted or compiled differently than what appears below. To review, open the file in an editor that reveals hidden Unicode characters.
Learn more about bidirectional Unicode characters
| <send-one-way-request mode="new"> | |
| <set-url>{{event-grid-topic-endpoint}}</set-url> | |
| <set-method>POST</set-method> | |
| <set-header name="aeg-sas-key" exists-action="override"> | |
| <value>{{event-grid-topic-key}}</value> | |
| </set-header> | |
| <set-header name="Content-Type" exists-action="override"> | |
| <value>application/json</value> | |
| </set-header> | |
| <set-body>@{ | |
| // Parse the request body | |
| var requestBody = context.Request.Body.As<string>(); | |
| JObject json = JObject.Parse(requestBody); | |
| // Add the customer ID, order details and | |
| // request ID of the API call to the event | |
| // data property. | |
| var data = json["order"]; | |
| data["customerId"] = json["customerId"]; | |
| data["requestId"] = context.RequestId; | |
| // Set the event type based off of the quantity ordered | |
| var quantity = (int) json["order"]["quantity"]; | |
| var eventType = quantity > 50 ? "Contoso.Orders.Large" : "Contoso.Orders.Normal"; | |
| // Events are sent in an array | |
| var events = new JArray(); | |
| // Initialize the event and add it to the array | |
| var newOrderEvent = new JObject(); | |
| newOrderEvent.Add("Data", data); | |
| newOrderEvent.Add("Subject", "contoso/newOrder"); | |
| newOrderEvent.Add("EventType", eventType); | |
| newOrderEvent.Add("Id", Guid.NewGuid().ToString()); | |
| newOrderEvent.Add("EventTime", DateTime.UtcNow.ToString()); | |
| events.Add(newOrderEvent); | |
| // Format to a string and ready to go! | |
| return events.ToString(Newtonsoft.Json.Formatting.None); | |
| }</set-body> | |
| </send-one-way-request> |
Let’s step through the policy and inline code a bit. The first thing to point out is the reference to the named values that were added earlier:
<set-url>{{event-grid-topic-endpoint}}</set-url>


<set-method>POST</set-method>


<set-header name="aeg-sas-key" exists-action="override">

  <value>{{event-grid-topic-key}}</value>

</set-header>
This recommended practice ensures that we are not placing any sensitive data inside our policies. It’s also a great mechanism for avoiding any error-prone data entry situations when configuring a policy.
The main piece is within the <set-body> section. Here, we are parsing the request body of the order and ultimately creating the payload for the request to Azure Event Grid:
This file contains hidden or bidirectional Unicode text that may be interpreted or compiled differently than what appears below. To review, open the file in an editor that reveals hidden Unicode characters.
Learn more about bidirectional Unicode characters
| // Parse the request body | |
| var requestBody = context.Request.Body.As<string>(); | |
| JObject json = JObject.Parse(requestBody); | |
| // Add the customer ID, order details and | |
| // request ID of the API call to the event | |
| // data property. | |
| var data = json["order"]; | |
| data["customerId"] = json["customerId"]; | |
| data["requestId"] = context.RequestId; | |
| // Set the event type based off of the quantity ordered | |
| var quantity = (int) json["order"]["quantity"]; | |
| var eventType = quantity > 50 ? "Contoso.Orders.Large" : "Contoso.Orders.Normal"; | |
| // Events are sent in an array | |
| var events = new JArray(); | |
| // Initialize the event and add it to the array | |
| var newOrderEvent = new JObject(); | |
| newOrderEvent.Add("Data", data); | |
| newOrderEvent.Add("Subject", "contoso/newOrder"); | |
| newOrderEvent.Add("EventType", eventType); | |
| newOrderEvent.Add("Id", Guid.NewGuid().ToString()); | |
| newOrderEvent.Add("EventTime", DateTime.UtcNow.ToString()); | |
| events.Add(newOrderEvent); | |
| // Format to a string and ready to go! | |
| return events.ToString(Newtonsoft.Json.Formatting.None); |
Some interesting things to point out:
- Lines 8-10: The data property of the event is being initialized with some of the values from the request.
- Lines 13-14: the event type property is being set conditionally based off of the quantity of items requested (Contoso.Orders.Large or Contoso.Orders.Normal).
- Line 17: Events are always sent in an array to Azure Event Grid.
- Lines 20-26: The event is being initialized and added to the array.
Lastly, to prevent API usage spikes, we can add a rate-limit-by-key policy right before the send one way request:
 <rate-limit-by-key calls="5"
   renewal-period="10"
   counter-key="@(context.Request.IpAddress)" />
Testing
Perhaps one of the coolest features of API Management is being able to test an API directly from within the portal. We’ll copy the sample request that was mentioned before into the request body and make a request:
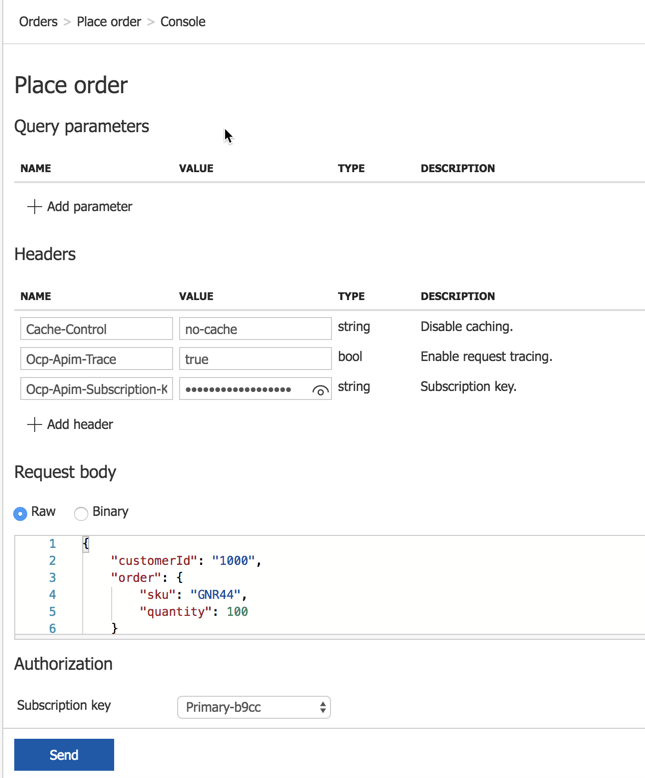
The end result is a successfully published event to the topic. I usually create an event subscription that uses either a storage queue or the Azure Event Grid Viewer as a handler. The following screenshot shows two handled events with different quantity values to highlight the dynamic event type property:

For completeness, the entire design for the operation is here:
This file contains hidden or bidirectional Unicode text that may be interpreted or compiled differently than what appears below. To review, open the file in an editor that reveals hidden Unicode characters.
Learn more about bidirectional Unicode characters
| <policies> | |
| <inbound> | |
| <base /> | |
| <!– Limit the number of calls from an IP address –> | |
| <rate-limit-by-key calls="5" renewal-period="10" counter-key="@(context.Request.IpAddress)" /> | |
| <!– Publish an event to grid –> | |
| <send-one-way-request mode="new"> | |
| <set-url>{{event-grid-topic-endpoint}}</set-url> | |
| <set-method>POST</set-method> | |
| <set-header name="aeg-sas-key" exists-action="override"> | |
| <value>{{event-grid-topic-key}}</value> | |
| </set-header> | |
| <set-header name="Content-Type" exists-action="override"> | |
| <value>application/json</value> | |
| </set-header> | |
| <set-body>@{ | |
| // Parse the request body | |
| var requestBody = context.Request.Body.As<string>(); | |
| JObject json = JObject.Parse(requestBody); | |
| // Add the customer ID, order details and | |
| // request ID of the API call to the event | |
| // data property. | |
| var data = json["order"]; | |
| data["customerId"] = json["customerId"]; | |
| data["requestId"] = context.RequestId; | |
| // Set the event type based off of the quantity ordered | |
| var quantity = (int) json["order"]["quantity"]; | |
| var eventType = quantity > 50 ? "Contoso.Orders.Large" : "Contoso.Orders.Normal"; | |
| // Events are sent in an array | |
| var events = new JArray(); | |
| // Initialize the event and add it to the array | |
| var newOrderEvent = new JObject(); | |
| newOrderEvent.Add("Data", data); | |
| newOrderEvent.Add("Subject", "contoso/newOrder"); | |
| newOrderEvent.Add("EventType", eventType); | |
| newOrderEvent.Add("Id", Guid.NewGuid().ToString()); | |
| newOrderEvent.Add("EventTime", DateTime.UtcNow.ToString()); | |
| events.Add(newOrderEvent); | |
| // Format to a string and ready to go! | |
| return events.ToString(Newtonsoft.Json.Formatting.None); | |
| }</set-body> | |
| </send-one-way-request> | |
| <return-response> | |
| <set-status code="200" reason="OK" /> | |
| </return-response> | |
| </inbound> | |
| <backend> | |
| <base /> | |
| </backend> | |
| <outbound> | |
| <base /> | |
| </outbound> | |
| <on-error> | |
| <base /> | |
| </on-error> | |
| </policies> |
Hopefully this spawns some new and innovative solutions with these cool services in Azure.
References and other relevant links
- Subscribing to Event Grid events with API Management
- Build 2018 Session
- Azure Integration Services
- Azure Event Grid Viewer

[…] In this post, I will demonstrate how to use Azure API Management (APIM) and Event Grid to unlock some interesting opportunities. If you are looking for ways to publish from APIM to Event Grid, please see this post: https://madeofstrings.com/2018/08/13/publishing-to-event-grid-from-azure-api-management/. […]
What if the incoming json is not valid json? How can I create a custom error stating that specific error? For now I get a 500 status, but I want to return a 400 error.
Great question. This could be accomplished with two policies: control flow and return response. Use control flow to inspect the payload. If it’s deemed invalid then use the return response with the status code that makes the most sense.
Thanks for your reply! It seems that I need to do a manual check of the json (try to convert it as JObject), but in a policy there is no try catch block to force a 400 error. Now the error is handled by the general error handler, which returns a 500.
You can add an error policy.
Maybe I could (mis)use the convert json to xml policy? It seems to me, that if the json is not valid, the conversion would raise an error?
Could be an option, just don’t forget the error policy to catch it.
Is there a specific reason to do a send-one-way-request? I accomplished the same thing with just rerouting to the backend and altering the body and headers with respective policies, and seems to be working fine! This way also potential errors in delivering the event to the event grid get populated back to the client, so the ball will not get dropped without error, i.e. in authentication failed scenarios.
The approach you took sounds great. In this scenario it was more of a fire-and-forget situation.